Repairing a Network Connection
When a user calls Microsoft
Support to resolve a networking issue, the support engineer has a list
of troubleshooting steps that he takes the user through. For example, if
there’s a problem with a DHCP network, the engineer usually starts by
telling the user to use IPCONFIG to release (ipconfig /release) and then renew (ipconfig /renew) the IP address. Other steps include running specific commands with the ARP (Address Resolution Protocol) and NBTSTAT (NetBIOS over TCP/IP Statistics) utilities.
Someone at Microsoft realized that all these steps could be automated by creating a script that runs the various ipconfig, arp, and nbstat commands. The result is the network connection repair tool, which runs the following six troubleshooting steps:
1. | Broadcasts a request for the renewal of the computer’s DHCP lease—A DHCP lease
is a guarantee that the DHCP client computer will have the IP address
supplied by the DHCP server for a specified period. To avoid lease
expiration, the DHCP client usually sends a request—a DHCPREQUEST
message—for lease renewal to the original DHCP server after 50% of the
lease time has expired. If 87.5% of its lease time has expired, the DHCP
client sends a lease renewal request to all available DHCP servers.
This broad request for a lease renewal is what the repair tool does.
Note
Why send a DHCPREQUEST
message instead of just using IPCONFIG to release and renew the IP
address? Because if the current address is functioning properly,
releasing that address could cause extra problems if a new address
cannot be obtained from a DHCP server. With a lease renewal request, the
DHCP client keeps its current address.
|
2. | Flushes the ARP cache—The ARP (Address Resolution Protocol)
handles the conversion of an IP address to the MAC address of a network
adapter. To improve performance, Windows Home Server stores resolved
addresses in the ARP cache
for a short time. ARP cache entries that are obsolete or incomplete
cause some networking problems. The cache is normally flushed regularly,
but the repair tool forces a flush. This is the same as running the
following command:
Tip
To see the contents of the ARP cache, run the following command:
You’ll see output similar to the following, which lists IP addresses and their corresponding MAC addresses:
Interface: 192.168.1.254 --- 0x10003
  Internet Address      Physical Address      Type
  192.168.1.101         00-c0-a8-b2-e0-d3     dynamic
  192.168.1.102         00-11-11-ce-c7-78     dynamic
  192.168.1.108         00-0f-66-ea-ea-24     dynamic
  192.168.1.111         00-0d-4b-04-27-2f     dynamic
|
3. | Flushes the NetBIOS name cache—NetBIOS handles the conversion between the network names of computers and their IP addresses. To improve performance, Windows Home Server stores resolved names in the NetBIOS name cache.
To solve problems caused by NetBIOS name cache entries that are
obsolete or bad, this step clears the cache. This is the same as running
the following command:
|
4. | Reregisters the computer with the network’s WINS server—The
repair tool asks the WINS server to release the computer’s NetBIOS
names that are registered with the server and then reregister them. This
is useful if you’re having problems connecting to other computers using
their network names. This is the same as running the following command:
|
5. | Flushes the DNS cache—DNS
handles the conversion of domain names to IP addresses. To improve
performance, Windows Home Server stores resolved domain names in the DNS
cache. To solve problems caused by DNS cache entries that are obsolete
or bad, this step clears the cache. This is the same as running the
following command:
|
6. | Reregisters the computer with the DNS server—This
is useful if you’re having trouble resolving domain names or if you’re
having trouble with a dynamic DNS server. This is the same as running
the following command:
|
To launch the repair process, log on to Windows Home Server, and then use one of the following techniques:
- In the connection’s Status dialog box, click Diagnose.
- In the Network Connections window, click the connection and then click Diagnose This Connection.
- Right-click the network icon in the notification area, and then click Troubleshoot Problems.
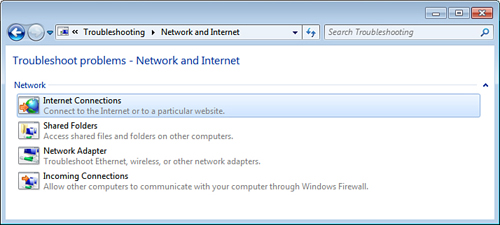
Working with the Network and Internet Troubleshooter
If you suspect you’re
having network trouble—such as computers on the network not being able
to see each other or file transfers or other network activity behaving
erratically—but you aren’t sure, one easy way to find out is to run the
Network and Internet Troubleshooter utility. This is a Control Panel
connectivity troubleshooting tool that can aid you in isolating network
problems.
To get started, log on to
Windows Home Server, select Start, Control Panel, Troubleshooting, and
then click Network and Internet. In the Network and Internet window (see Figure 4), click the type of problem you’re having to launch the associated troubleshooting tool.
Troubleshooting Cables
If one of the
problems discussed so far isn’t the cause of your networking quandary,
the next logical suspect is the cabling that connects the workstations.
This section discusses cabling, gives you a few pointers for preventing
cable problems, and discusses some common cable kinks that can crop up.
Although third-party cable
installers perform most large-scale cabling operations, home setups are
usually do-it-yourself jobs. You can prevent some cable problems and
simplify your troubleshooting down the road by taking a few precautions
and “ounce of prevention” measures in advance:
- First and
foremost, always buy the highest-quality cable you can find (for
example, Category 5e or higher for twisted-pair cable). With network
cabling, you get what you pay for.
- Good-quality cable is labeled. You should also add your own labels for things such as the cable source and destination.
- To
avoid electromagnetic interference, don’t run cable near electronic
devices, power lines, air conditioners, fluorescent lights, motors, and
other electromagnetic sources.
- Try to avoid phone lines because the ringer signal can disrupt network data carried over twisted-pair cable.
- To avoid the cable being stepped on accidentally, don’t run it under carpet.
- To avoid people tripping over a cable (and possibly damaging the cable connector, the NIC port, or the person doing the tripping!), avoid high-traffic areas when laying the cable.
- If you plan to run cable outdoors, use conduit or another casing material to prevent moisture damage.
- Don’t use excessive force to pull or push a cable into place. Rough handling can cause pinching or even breakage.
If you suspect cabling might be the cause of your network problems, here’s a list of a few things to check:
- Watch for electromagnetic interference—If you see garbage on a workstation screen or experience random packet loss or temporarily missing nodes,
the problem might be electromagnetic interference. Check your cables to
make sure they are at least 6 to 12 inches from any source of
electromagnetic interference.
- Check your connections—Loose
connections are a common source of cabling woes. Be sure to check every
cable connection associated with the workstation that’s experiencing
network difficulty, including connections to the network adapter,
router, switch, and so on.
- Check the lay of the line—Loops
of cable could be generating an electrical field that interferes with
network communication. Try not to leave your excess cable lying around
in coils or loops.
- Inspect the cable for pinching or breaks—A
badly pinched cable can cause a short in the wire, which could lead to
intermittent connection problems. Make sure that no part of the cable is
pinched, especially if the back of the computer is situated near a
wall. A complete lack of connection with the network might mean that the
cable’s copper core has been severed completely and needs to be
replaced.
Troubleshooting the Network Interface Card
After cabling, the NIC is next
on the list of common sources of networking headaches. Here are some
items to check if you suspect that Windows Home Server and your NIC
aren’t getting along:
- Make sure that Windows Home Server installed the correct NIC—Windows
Home Server usually does a pretty good job of detecting the network
card. However, a slight error (such as choosing the wrong transceiver
type) can wreak havoc. Double-check that the NIC listed in Device Manager
(see the next section) is the same as the one installed in your
computer. If it’s not, click Remove to delete it, run the Add Hardware
Wizard, and choose your NIC manually.
- Perform a physical check of the NIC—Open the case and make sure the card is properly seated in its slot.
Caution
Before touching any
component inside a computer case, ground yourself to prevent
electrostatic discharge. To ground yourself, touch any metal surface,
such as the metal of the computer case.
- Try a new NIC—Try swapping out the NIC for one that you know works properly. (If the existing NIC is on the computer’s motherboard, insert the working NIC in an open bus slot.) If the switch fixes the problem, remove the faulty interface card (if possible) and insert a new one.
- Get the latest driver—Check
with the manufacturer of the NIC to see whether it has newer Windows
Home Server or Windows Server 2008 64-bit drivers for the card. If so,
download and install them, as described in the section after next.
Viewing the NIC in Device Manager
Windows Home Server stores all
its hardware data in the Registry, but it provides Device Manager to
give you a graphical view of the devices on your system. To display
Device Manager, log on to Windows Home Server, click Start, right-click
Computer, click Manage in the shortcut menu, click Diagnostics, and then
click Device Manager.
Tip
A quick way to go directly to the Device Manager snap-in is to select Start, type devmgmt.msc,
and press Enter. Note, too, that you can also press Windows
Logo+Pause/Break to display the System window, and then click Device
Manager.
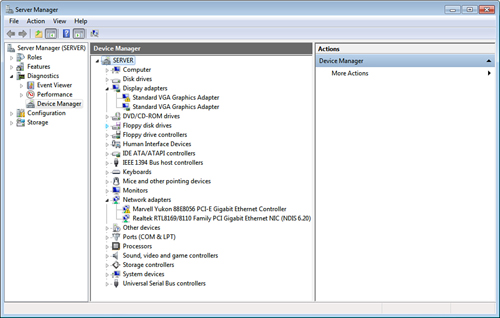
Device Manager not only
provides you with a comprehensive summary of your system’s hardware
data, but it doubles as a decent troubleshooting tool. To see what I
mean, check out the Device Manager tab shown in Figure 5.
See how the icon for the Marvell Yukon 88E8056 PCI-E Gigabit Ethernet
Controller device has an exclamation mark superimposed on it? This tells
you that there’s a problem with the device.
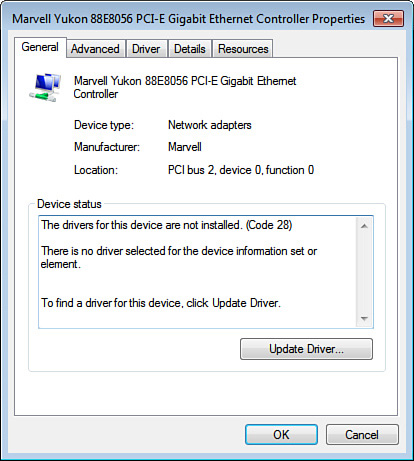
If you examine the device’s properties, as shown in Figure 6, the Device Status area tells you a bit more about what’s wrong. As you can see in Figure 1.9,
the problem here is that the device’s driver isn’t installed. Either
try Device Manager’s suggested remedy (in this case, click Update Driver
to locate a driver for the device) or launch the hardware
troubleshooter.
Note
Device Manager has several
dozen error codes. See the following Microsoft Knowledge Base article
for a complete list of the codes, as well as solutions to try in each
case: http://support.microsoft.com/kb/310123/. (This page shows codes for XP, but they also apply to Windows Home Server.)
Device Manager uses three different icons to indicate the device’s current status:
- A black exclamation mark (!) on a yellow field tells you that there’s a problem with the device.
- A red X tells you that the device is disabled or missing.
- A
blue i on a white field tells you that the device’s Use Automatic
Settings check box (on the Resources tab) is deactivated and that at
least one of the device’s resources was selected manually. Note that the
device might be working just fine, so this icon doesn’t indicate a
problem. If the device isn’t working properly, however, the manual
setting might be the cause. (For example, the device might have a DIP
switch or jumper set to a different resource.)
Updating the NIC Device Driver
If
a device is flagged on your system but you don’t notice problems, you
can usually get away with just ignoring the flag. I’ve seen lots of
systems that run perfectly well with flagged devices, so this falls
under the “If it ain’t broke...” school of troubleshooting. The danger
here is that tweaking your system to try to get rid of the flag can
cause other—usually more serious—problems. Otherwise, a good next step
is to get an updated device driver from the manufacturer and then install it.
Follow these steps to update a device driver:
1. | If
you have a floppy disk or CD with the updated driver, insert the disk
or CD. If you downloaded the driver from the Internet, decompress the
driver file, if necessary.
|
2. | In Device Manager, click the device you want to work with.
|
3. | Select Action, Update Driver. (You can also open the device’s property sheet, display the Driver tab, and click Update Driver.)
|